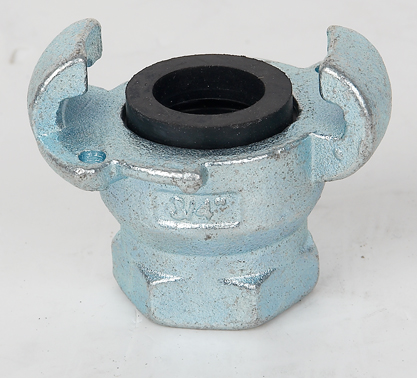
Ensuring Optimal Functionality: Installation and Maintenance Procedures for the Australian Type Universal Claw Coupling Male Thread
2024-06-19
The Australian type universal claw coupling male thread is renowned for its reliability and versatility across various industries. To maintain its optimal functionality, proper installation and regular maintenance are crucial. In this blog, we will explain the detailed installation and maintenance procedures that ensure the longevity and performance of these essential components.
Installation Procedures
1. Preparation
Before starting the installation process, gather all necessary tools and equipment, including:
- The Australian type universal claw coupling male thread
- Compatible hoses or pipes
- Pipe wrenches or spanners
- Thread sealant or Teflon tape
2. Inspect Components
Ensure that all components, including the coupling, hoses, and pipes, are clean and free of debris. Check for any visible damage or defects that could affect the coupling's performance.
3. Apply Thread Sealant
To create a leak-proof connection, apply a suitable thread sealant or Teflon tape to the male threads. Wrap the tape clockwise around the threads, covering them evenly without overlapping excessively.
4. Attach the Coupling
Align the male thread of the coupling with the female thread of the hose or pipe. Carefully screw the coupling into the hose or pipe, tightening it by hand initially. Use a pipe wrench or spanner to secure the connection firmly, but avoid over-tightening, which could damage the threads or coupling.
5. Connect Coupling Halves
Once the coupling is securely attached to the hose or pipe, connect the two halves of the claw coupling. Ensure that the claws of both halves interlock correctly. Press the coupling halves together firmly until they snap into place, ensuring a secure and tight connection.
6. Check for Leaks
After installation, test the connection by running air, water, or the relevant fluid through the hose. Check for any signs of leaks or weak connections. If any leaks are detected, tighten the connections further or reapply thread sealant as necessary.
Maintenance Procedures
1. Regular Inspections
Conduct regular inspections of the claw coupling and its connections. Look for signs of wear, corrosion, or damage. Pay special attention to the claw interlock mechanism, as any wear or misalignment can lead to leaks or disconnections.
2. Clean Components
Periodically clean the coupling and associated components to remove dirt, debris, and any build-up that could affect performance. Use a soft brush or cloth and a mild cleaning solution to clean the coupling thoroughly.
3. Lubrication
Apply a light lubricant to the claw interlock mechanism to ensure smooth operation. Avoid using excessive amounts of lubricant, as this can attract dirt and debris, leading to clogging and wear.
4. Replace Worn Parts
If any part of the coupling shows signs of excessive wear or damage, replace it immediately. Using worn or damaged couplings can compromise the entire system's safety and efficiency.
5. Check Tightness
Regularly check the tightness of the coupling connections. Over time, vibrations and pressure fluctuations can cause connections to loosen. Re-tighten as necessary to maintain a secure and leak-proof connection.
6. Test Pressure
Periodically test the system's pressure to ensure it operates within the coupling's specified range. Excessive pressure can damage the coupling and lead to leaks or failures.
Conclusion
The Australian type universal claw coupling male thread is a robust and reliable component essential for many industrial applications. Proper installation and regular maintenance are key to ensuring its optimal functionality and longevity. By following the procedures outlined in this blog, you can maintain a secure, leak-proof connection that will serve efficiently and safely across various applications. Regular inspections, cleaning, lubrication, and timely replacement of worn parts will keep your coupling system in top condition, ensuring smooth operations and minimal downtime.