

Complete Plywood Die Board Laser Cutting Machine: How It Works and Why You Need One
2026-11-02
If you're still cutting die boards by hand or with outdated CNC routers, you already know the pain: splintered edges, slow turnaround, and wasted plywood. A complete plywood die board laser cutting machine changes that equation. ADEWO builds these systems to cut clean, tight slots at speeds that make manual methods look like a hobby project. Let's look at how the laser actually does it—and why the switch is less complicated than you think.
What the Laser Actually Does to Plywood at 400 Inches Per Minute
At 400 inches per minute, the laser doesn't slice through plywood in one clean pass like a saw. Instead, it moves fast enough that the beam acts more like a rapid-fire chisel, vaporizing the top veneer and charring the glue line beneath. You'll see a dark, slightly raised edge where the beam hit—almost like a pencil line that got scorched into the wood. The heat is so brief that the surrounding material barely warms up, which is why you can touch the cut edge seconds later without burning your fingers.
What surprises most people is the noise. There isn't the grinding whine of a router or the tear-out of a jigsaw. Just a soft hiss as the laser pulses, and a thin wisp of smoke that smells like a campfire mixed with burnt adhesive. The kerf is narrow—maybe a few hundredths of an inch—but the edges aren't polished. They're brittle, almost sugary to the touch, because the wood fibers have been turned to carbon rather than cut. If you flex the board near the cut line, it can crack along that charred path like a stale cookie.
The glue between the plies is the wildcard. Different adhesives react differently—some bubble and pop, leaving tiny craters along the cut edge; others just darken and hold. At this speed, the laser rarely penetrates more than a quarter inch deep in a single pass, so you're really just marking or kiss-cutting the surface. To get through half-inch plywood, you'd need to slow way down or make multiple passes, letting the beam chew away layer by layer. But at 400 IPM, you're not cutting through—you're writing with fire on a wooden page.
Why Your Die Board Accuracy Depends on a Single Overlooked Calibration
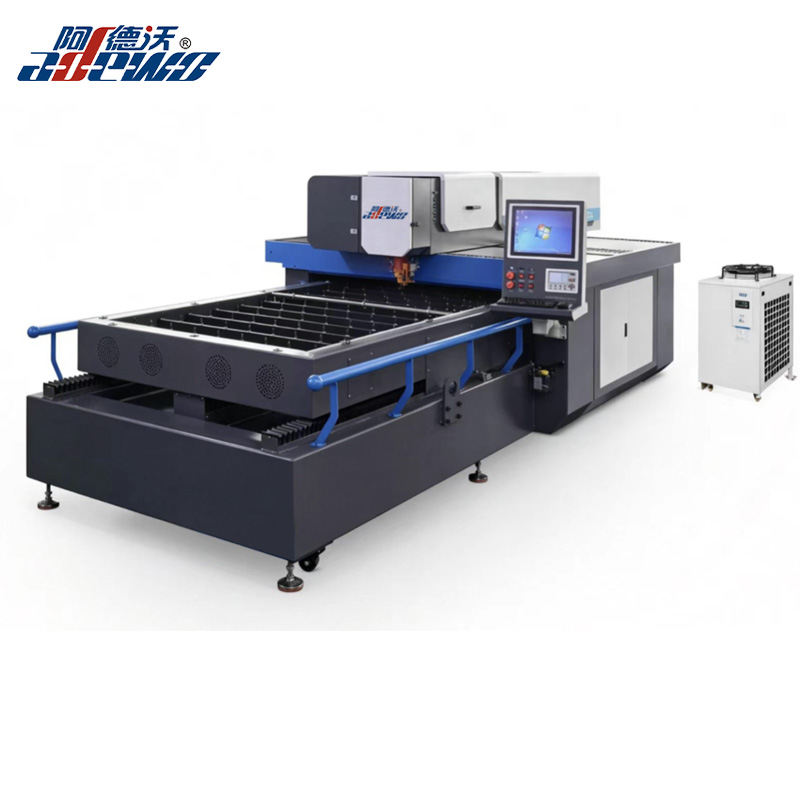
In die board production, most shops chase accuracy by tightening tolerances on the cutting table or investing in higher-end substrates. Yet one parameter quietly drifts out of spec long before other checks catch it: the calibration of the beam’s focal point relative to the board surface. When that distance shifts by even a few thousandths of an inch, the kerf width changes unevenly across the sheet. Slots that should accept a rule snugly end up slightly oversized in one corner and undersized in another, and no amount of post-cut measuring fixes the root cause.
The trouble is that this calibration rarely gets daily attention because its symptoms look like material inconsistency or dull tooling. Operators compensate by nudging speed or pressure, which masks the drift for a while. A practical routine is to cut a small test pattern at the start of each shift—two perpendicular lines and a circle—then measure the kerf at three points under a loupe or microscope. If the variation exceeds half a thou, recalibrate the focal offset before running production. That single habit often eliminates the mysterious rejects that otherwise force a shop to re-cut entire boards.
Inside the Kerf: A 0.1mm Beam Replaces Jigs, Saws, and Hand Files
A kerf used to be a compromise. Woodworkers accepted the wide bite of a saw blade because that was the price of cutting anything at all. Every pass removed material you had measured twice and still couldn't get back. Jigs existed to steer around the slop, hand files existed to erase it, and a skilled craftsperson spent years learning to predict where the line would actually end up.
A 0.1mm beam changes that arithmetic. There is no tooth set, no wandering blade, no clamp pressure twisting the stock. The cut is so narrow that offcuts stay in place until you lift them out. You stop thinking about compensating for the tool and start drawing the part you actually want. Tabs and notches fit without a test pass, and the mating edges look burnished rather than sawn.
That shift quietly retires a lot of shop furniture. Jigs for repeat cuts, saw guides for straight lines, a drawer full of rasps and needle files — none of them earn their bench space once the beam is doing the fitting. The skill doesn't disappear; it moves from correcting the cut to designing for it. And the kerf stops being a gap you fight and becomes a dimension you control.
The Hidden Cost of Manual Slot Cutting in Modern Die Production
At first glance, manual slot cutting in die production looks like a low-cost, flexible option. No expensive CNC programming, no waiting for toolpaths, just a skilled hand guiding a mill or EDM wire. But that apparent savings dissolves the moment you track the full cycle. Every slot is a fresh negotiation between the operator's judgment and the steel's resistance. The result isn't just longer lead times—it's a slow bleed of precision that compounds across the die set.
The real hidden cost lives in the rework and the quiet adjustments nobody logs. A slot cut a few thousandths wide might still slip the punch through, but the clearance becomes uneven. That unevenness accelerates wear on both the punch and the die button. Weeks later, the die starts producing burrs, then cracked corners, then a service call that costs ten times what an automated slotting pass would have prevented. Manual methods also freeze your best talent in front of a machine when they could be solving the next design problem.
In high-mix shops, manual slot cutting also breaks the reproducibility chain. One operator's technique differs from another's, so the same die design yields different results on different shifts. This forces downstream fitting, shimming, and hand polishing that never shows up in the original quote. When the true cost finally appears—scrap parts, missed delivery dates, or a die that fails mid-run—it arrives as a line item nobody expected. The cheapest slot, it turns out, is the one you cut once, in a controlled, repeatable way.
A Walkthrough of the Cutting Sequence From File Import to Finished Board
When a design file lands in the cutting software, the first real step is checking scale and material thickness against the actual stock you have on hand. A board that looks right on screen can warp or vary by a couple millimeters, so measure the blank before you ever assign a toolpath. Import the vector or 3D model, clean up any open vectors or duplicate lines, and set your origin point where the bit can reference without crashing into clamps.
From there, the sequence moves through roughing and finishing passes. Roughing clears the bulk with a larger end mill, leaving a small skin of material for the finish pass to shave away cleanly. Feeds and speeds matter more than most beginners expect; too slow and you burn the wood, too fast and you snap a bit or leave chatter marks. A quick air pass above the board will catch any toolpath oddities before the bit ever touches the surface.
Once the final pass completes, remove the board and sand or scrape the edges gently instead of reaching for power tools right away. Check the fit of any joinery or inlay while the piece is still secured if possible. Small adjustments to the file, like adding a negative offset to a pocket or changing the stepover on a 3D carve, often make the difference between a rough prototype and a finished board that drops into place without forcing.
What Changes When You Swap Router Templates for a Laser Path
Replacing a hand-held router template with a laser-guided path changes how you think about material removal. Instead of tracing a physical edge, you follow a projected line that can be altered in seconds. This removes the need to cut, store, and maintain multiple templates for different shapes. You also stop worrying about bearing wear or template slippage, because the guidance no longer depends on a mechanical contact point. The result is a faster setup and cleaner transitions between custom profiles, especially for one-off pieces or rapid prototyping.
Accuracy shifts from being tied to a rigid object to being tied to a calibration routine. A router template gives you repeatability as long as the template stays undamaged. A laser path gives you repeatability as long as the projection stays aligned with the machine’s coordinate system. That means you trade physical durability for digital adjustability. Small errors in laser alignment or software scaling can show up as consistently skewed cuts, but they are also easier to fix than sanding down a warped acrylic template. Over time, this changes how you troubleshoot: you check beam squareness and focal distance before you check cutter sharpness.
The workflow also gets less linear. With templates, you usually design, cut the template, then route. With a laser path, you can jump between design tweaks and cutting without ever leaving the workstation. This can be a huge advantage for iterative work like inlay fitting, where you might adjust a curve by half a millimeter and recut immediately. However, it demands more discipline with file naming and version control, because the physical template no longer serves as a tangible record of past decisions. You end up relying on the digital file history to understand why a particular cut was made, which is a different kind of shop memory.
FAQ
It is a machine that uses a focused laser beam to cut precise slots and openings in plywood sheets, creating die boards for cutting and creasing packaging materials like cardboard and corrugated board.
The laser beam is tightly focused and moves quickly, vaporizing a narrow kerf. A gas assist, usually air or nitrogen, blows away debris and cools the cut zone, minimizing charring and leaving clean edges suitable for steel rule insertion.
Laser cutting delivers much tighter accuracy, especially on complex or small slots, without physical blade wear or vibration. It also handles intricate curves and fine details faster, reduces manual filing, and gives consistent results across production runs.
Typically it includes the laser source, often CO2, a motion control system, a cutting table with vacuum hold-down, a computer running dedicated die board software, and an exhaust or filtration unit. Some setups also add automatic loading or rule insertion assistance.
Yes. By adjusting laser power, speed, and focus, the same machine can cut precise slots for cutting rules and shallower or narrower grooves for creasing rules in plywood from around 12 mm to 18 mm or even thicker, depending on laser wattage.
There is very little mechanical stress because the laser is a non-contact process. The heat-affected zone stays minimal when settings are correct, so the board remains flat and dimensions stay true, which is critical for high-volume die cutting.
Most modern systems come with intuitive software that imports CAD or vector files directly. Operators mainly load the plywood, select the correct material settings, and monitor the job. Basic training usually takes a few days, though advanced troubleshooting takes longer.
Regular cleaning of optics, checking and aligning mirrors, emptying the exhaust or changing filters, and keeping motion rails lubricated. Laser tube or RF source life depends on usage, but routine checks keep downtime low.
Conclusion
At 400 inches per minute, the laser doesn’t just slice plywood—it vaporizes a hair-thin channel, leaving edges that need no sanding. The beam’s 0.1mm kerf changes everything: jigs, hand saws, and files vanish from the workflow. But that precision hinges on one often-ignored calibration step; if the beam alignment drifts even slightly, every slot and notch across the entire die board shifts with it. Manual slot cutting hides a heavy price too—slow, inconsistent, and prone to rework that eats into margins.
Swapping router templates for a laser path turns a rigid, tooling-heavy process into a digital one. Import a file, and the machine follows a programmed sequence that cuts every slot, hole, and contour in a single pass. There’s no template wear, no chatter, no variance from one board to the next. What used to require hours of setup and skilled hand-finishing now moves from screen to finished die board in minutes. That’s why a complete plywood die board laser cutting machine isn’t just an upgrade—it’s the difference between fighting tolerances and simply printing your board geometry at full speed.
Contact Us
Contact Person: KAELYN LEE
Email: [email protected]
Tel/WhatsApp: +86 15012673758
Website: https://www.china-adewo.com